Wednesday, March 28, 2012

Homemade Irish Nachos Recipe

In high school, I worked at an Irish pub in Topeka that made the BEST Irish nachos I've ever had. Unfortunately, the restaurant has since closed and I am without my Irish nacho supplier. Luckily, I've found a recipe that has filled the void left by these nachos. Cue Rachel Ray's Irish Nacho Recipe. We pretty much made it according to her instructions, but instead of waffle fries, be made our own potato chips by thinly slicing potatoes then frying them in canola oil. We decided that this wasn't really worth the effort, so next time I think we'll just go the store-bought kettle chips route. Then I just got corned beef thickly sliced from our grocery store, cut it into cubes, and warmed it in olive oil. I might get it cut thinly next time. I left out the cabbage and onions (as Ben is morally opposed to vegetables). We just layered chips, corned beef, and cheese sauce. I added jalapenos, tomatoes, and sour cream. Ben just used Mrs. Renfro's Raspberry Chipotle Salsa. I was so thrilled with how they turned out. They were absolutely delicious, and we will definitely be making them again!

Photo courtesy of Rachel Ray

Enjoy!

~Annie

Tuesday, March 27, 2012

My New Best Friend: Coconut Oil

Are you tired of hearing me talk about how we're going natural? If so, I apologize. If not, well you're in luck, my friend!

Photo from Walmart.com

I've read article after article on it, listened to my sister-in-law talk about it, and I am FINALLY convinced that coconut oil is pretty much the single greatest substance in the world. Jenna Marbles' blog post about it is hysterical. I picked up a jar of virgin, unrefined coconut oil today. I've eaten it on a couple of things, and I put it on Izzy's bottom because she has one of the worst diaper rashes I've ever seen. So far I like it, but I'll let you know more later. I think I'll be picking up a jar of refined coconut oil to use in more foods, so I'm looking forward to that. That's my product rant for the day!

~Annie

The Natural Journey Continues

As I said before, I have begun dabbling in living a more natural life. Like many people I know, I have a nasty addiction to Clorox wipes. They are very convenient and leave my bathroom squeaky clean. They also, however, stink. They leave my bathroom smelling like harsh bleach for days. In an effort to live more organically, I am trying to kick my Clorox wipe habit. I have begun using wipes like those listed on "One Good Thing" by Jillee. While you could use old t-shirts like Jillee, I just went out and bought a pack of 18 white washcloths for $4 from Walmart. I left out the castile soap because I couldn't find any here in Grundy. However, later I found out from Lisa Bronner's blog that mixing castile soap and vinegar is a no-no (as is mixing vinegar and bleach, so don't go adding a little bit to your "Clorox" wipes thinking it will make it even better. It will just make toxic chlorine gas)! I've used them a couple times to clean the bathroom and so far they seem to be working pretty well!


My "Clorox" Wipes. I kept an old Clorox wipe container and pulled the flaps out so I could pull the washcloths through.

 I have since found out that using lemon juice limits the shelf life of these wipes to 3-4 weeks as it will go rancid. You could leave it out or use essential oils instead. Once my bottle of Clorox spray cleaner runs out, I'm going to make this bleach alternative from Frugally Sustainable, and I'll let you know how it goes! Until then, cheers!

~Annie

Going the Natural Route

After seeing various articles floating around talking about living naturally, I finally started looking into it. I have to say, I was pretty impressed! While I'm not ready to throw out the bleach and stop washing my hair, I am willing to give a couple ideas a try, starting with making my own laundry detergent! I used the recipe from Being Creative to Keep my Sanity. I highly, I repeat, HIGHLY recommend that you use a food processor to grate the soap or it takes for-ev-er! Also, don't try to stir that stuff with a spoon. Just dig your hands in there and mix it up. I used it for a couple of loads of laundry the other day, and so far I'm pretty impressed. I didn't take many pictures, but here are a couple of the end result:


The completed mixture. I didn't bother getting a lid for my 5-gallon bucket because you have to pay for it and if you line your bucket with a trash bag, you can just tie the bag up until you need to get out more!


I got a little jar from Walmart, and a coffee scoop because it's the perfect size for one load of laundry. So that's it. Super easy, and extremely cheap! So happy I decided to give this a try!

~Annie

(DIY) Lace Ruffle Petti Romper Tutorial

As promised, I've completed Izzy's petti romper and I can't wait to share it! I've seen these everywhere for portraits lately, and I couldn't be happier with how it turned out. For starters, head over to Frame Worthy Shot for the full tutorial that I followed. Then, look below for my small alterations to her tutorial.


Materials
-lace (I used about 10 or so yards of 1 1/2" flat [non-elastic] lace. I wouldn't go any larger than 1 1/2" wide ribbon, but I wouldn't go smaller than 1")
-coordinating satin lining (I ordered a yard, but it only takes about half)
-elastic thread on a bobbin
-thread that matches your lace, and matching bobbin
-3/4" elastic

1) I cut my lining into a rectangle. Mine was 30"x15"for my 11 month old, but she's on the smaller side

2) Once I had my rectangle, I sewed a 1/4" hem on the bottom of the romper, and a 1" hem at the top to accommodate the elastic.

3) Next, start sewing that lace on! I ordered my lace online from Lace Heaven. They have a huge selection and it is very reasonable. I started at the bottom and began sewing the lace onto the satin lining using the elastic thread on the bobbin. Turn your tension all the way to up (to "0" on my machine). If you've never used elastic thread, you might want to practice on some spare fabric just to get a feel for it. You also may want to draw a guide line on your satin before sewing on each layer of lace. Work your way up the romper, sewing the lace on in horizontal rows, making sure to reverse stitch at the beginning and end of each row to secure the elastic thread.

4) When all your lace is sewn on, fold the scrunchy rectangle so that the lace is on the inside. Put your regular thread in the bobbin, and stitch the resulting tube shut with about a 1/2" seam allowance. Don't sew the top hem shut so you can still put your elastic in. You may want a bigger seam allowance if you need to make it smaller. You can just cut off the excess.

5) Once you have your lovely ruffled tube, pull the elastic through the top so it fits your little one and stitch the ends together. Once you have that done, stitch your tube the rest of the way shut.

6) Finally, turn your romper right side out, and, using a straight stitch, sew about a 1/2" seam in the center on the bottom to create little leg holes. You really don't need much of a seam unless you want the "shorts" part longer.


And now for the best part- try it on your baby! I got the pleasure of seeing this on Izzy at around 4 in the morning the other day when she decided to wake up from 3 until 7:30 am. Although I haven't tried making one with elastic lace like Frame Worthy Shot did, I think using regular lace with elastic thread in the bobbin is easier because you don't have stretch the lace out as you sew, but do whatever seems easier for you! So excited for Izzy's pictures so I can see her posing in all of the cute outfits I have for her!

~Annie

(DIY) Lace Ruffle Diaper Cover Tutorial

I've been getting outfits together for Izzy's one year pictures coming up in March. The colors were inspired by an outfit I found at K-Mart: flutter sleeve eyelet dressgirl's cardigan sweater, and girl's floral leggings, in shark (all Route 66 from K-Mart). Then, I started brainstorming for her other two outfits. I finally landed on a pink lace ruffle petti romper and a ruffled diaper cover for when she breaks into her smash cake. I will do a post about the romper later, but for now, I'll show you how I made the diaper cover. My in-laws got me a sewing machine for Christmas, and this was my first real project on it!!!


Materials:
-diaper cover (I just grabbed one out of Izzy's drawer, but you can make one yourself if you feel so inclined. Here is a tutorial from CraftGossip.com)
-lace trim (I used 3/4" seam binding)
-elastic thread, on a bobbin
-thread that matches your lace, as well as a matching bobbin

1) First, I ruffled the lace using a tutorial from CraftyMama. Super simple. The only change I made was that I sewed the elastic thread down the middle instead of on the edge.

2) Next, I switched out the elastic bobbin with the regular thread and sewed the lace ruffle onto the diaper cover. I did it in one continuous piece so the elastic wouldn't come out. Make sure you reverse stitch at the beginning and the end to secure the elastic thread. You may want to draw lines on the diaper cover to help you sew straight.


See? Simple! Now it's time to slip it on the little baby booty and "ooo" and "aww!" Can't wait to see her smash that cake in it!

~Annie

(DIY) Towel Cake Tutorial

For my brother's wedding in December, I didn't want to just buy them a present and stick it in a bag. Bor-ing! I decided to put my spin of the always popular diaper cake on my gift. I went to Bed, Bath, and Beyond and purchased various kitchen items that they had registered for, then I got to work!


Materials:
-dish towels
-dish cloths
-rubber bands (one for each towel)
-pie plate
-dowel rod or utensil that will fit inside your "cake" to stabilize it
-various utensils and items to decorate your "cake" with
-coordinating ribbon
-coordinating tulle

1) Once you have all your items, begin rolling the towels into tubes and secure with a rubber band.

2) When you have all your towels rolled up, begin arranging them on the pie plate. I used four dish towels on the first layer, and wrapped a rubber band around all four. Then I inserted one of the utensils into the center, but if you can't find a utensil that is tall enough or small enough to fit, a dowel rod would work, too. The next layer I used 3 dish cloths, arranged them around the utensil, and secured them with a rubber band.

3) The third layer was just one dish cloth. I set it on top and fixed the whole thing to make it pretty.

4) Next, I began wrapping my ribbon around each layer to cover the rubber bands. I used hot glue to secure the ribbon in the back

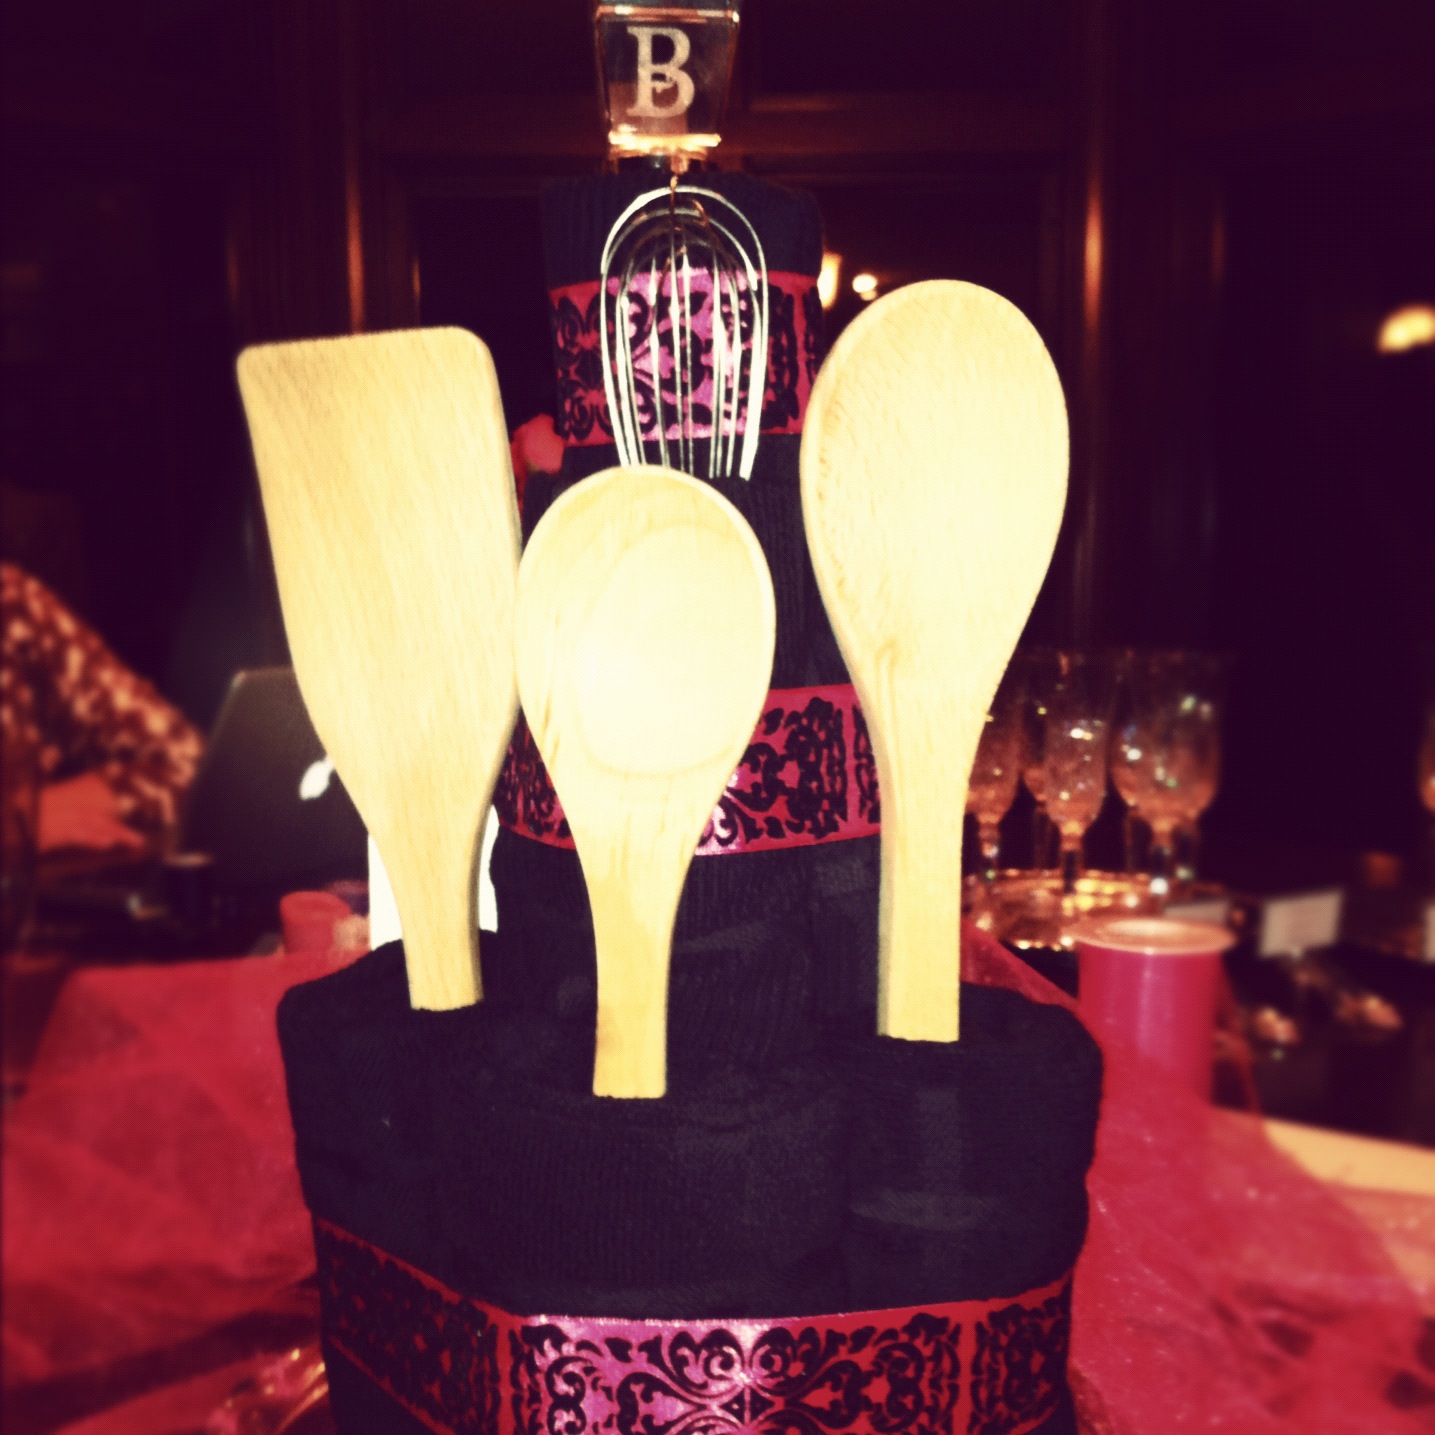
5) Then, I added the rest of my utensils to decorate it, and added a "B" monogram wine stopper to the top as a cake topper.

6) When I was done, I placed the card inside, wrapped the whole thing in matching tulle, tied it shut and attached a cute velvet curly ribbon. I love how it turned out! In fact, my aunt ended up using it as a decoration for the guestbook table at the bridal luncheon the day before the wedding!


I seriously lucked out that my brother and sister-in-law registered for towels that matched their wedding colors (black, white, and fuschia). This project would be great for weddings, showers, even graduation gifts. You could also do this with bath towels or other household linens. This gift is as fun to make and give as it is to receive!

Let me know if you have suggestions for other variations on this idea.

~Annie

(DIY) Recycled Book Planter Tutorial

My antique shopping proved successful once again! This time I found some old books for $4 a piece that I decided would look just lovely repurposed as a planter for my succulents. It was a fairly simple project. I just outlined where I wanted my plants to go and used a utility knife to cut the pages out little by little. This proved to be a little tricky as my book was VERY old and the pages crumbled and tore, but it still worked out fine! Once I had the pages cut out down to the back cover, I used a piece of a plastic trash bag and hot glued it to the first page under the cover. Next, I put a layer of small pebbles in the bottom to allow for drainage, then the dirt and my plants. Voile! Books reborn as a planter! If you have succulents, they just need to be sprayed with water from a spray bottle once a week. Couldn't get much easier! I set my planter on top of another book, but they would look great standing alone, too!


Happy crafting!

~Annie

(DIY) Recycled Window Message Board Tutorial

I have recently been obsessed with old windows... mainly because I found an auction house that will give them to me for free! Thanks to Miller Land and Auction I am now the proud owner of 4 beautiful, sturdy windows. The first one I made into a message board for my mom as a Christmas present. I don't have pictures of the process, but I can give you step-by-step instructions:


Materials
-old window
-paint stripper (if you want to remove the old paint)
-paint scraper
-sand paper or electric sander
-paint, stain, or varnish
-brush or sponge for applying paint, stain, or varnish
-caulk or silicon and caulk gun
-masking tape
-cork squares
-chalkboard paint
-metal for the magnet board (we used a cheap cookie sheet, but if you have some other magnetic scrap metal, go ahead and use that)
-scrapbook paper
-cardboard
-hanging hardware

1) First, find an old window. This really shouldn't be too difficult to do. Like I said, I found mine at an auction company, but you can also look at thrift and antique stores, estate sales, garage sales, even on the curb. Just look around, but make sure the one you find is fairly sturdy. 

2) Wipe the window down with a rag and warm soapy water. If you don't want to use the paint that is on the window, use paint stripper and a scraper to remove the old paint, according to package instructions. Once the paint is removed, wipe it down with mineral spirits to remove remaining paint stripper. At this time, also scrape off any old caulk that may be on the backside of the window if it is in poor shape. 

*NOTE: The paint used on the window may very likely contain lead, so make sure you do this away from children and pets, and dispose of the scrapings carefully*

3) Once the window is COMPLETELY dry, sand it. You can either do this by hand with sand paper or you can use an electric sander. I did it by hand, but only because we don't have an electric sander! 

*NOTE: Again, because of the lead paint, be sure to wear mask and to do this step away from children and pets* 

5) Wipe the window down again. This time you want to do a very good job with it as you will be staining or painting it next. Again, I used warm soapy water and a clean cloth.

6) Now, decide whether you want to paint, stain, or just seal the window. I decided to use a clear varnish on my window, but you can do whatever makes you happy! Use masking tape to tape off the window panes, then paint or varnish away!

7) When the paint or stain is completely dry (check product instructions for drying times), peel the tape off, and it's time to re-caulk the windows to secure them. I used a clear silicon, but you can use anything that will work on glass and wood. 

8) Once the caulk is dry (again, check product instructions), clean the glass well with glass cleaner. Next,  cut your cork and metal down to size. Make sure you measure from the correct side of the glass. I attached my cork boards to the glass on the front side, so I measured the panes on the front. Once the cork was cut to size, I used the clear silicon to adhere it directly to the glass. The metal, however, I measured from the back because it was replacing a pane that had been broken out. We used tin snips to cut the metal, but a jigsaw would have been MUCH easier. Once we finally got the metal cut to size, we placed it in the back side of the window and used the metal clips inside the window to hold it down. Then, we siliconed it in place. 

9) Next, I taped off the window except for one pane so I could spray chalkboard paint on that pane. Then I cut scrapbook paper and cardboard to fit in two of the panes. One of them was a dry erase board, and the other I used for pictures. I taped the pictures directly to the paper, set it in the window (from the back), then set the card board behind it and taped it in place. 

10) Finally, add hanging hardware to the back, hang it up, and step back and check out your "new" message board!


I hope you enjoyed this tutorial and it wasn't too difficult to understand! Let me know what you think!

~Annie

Welcome!

Welcome to my blog! I plan to blog about the things that occupy my time. I am a mom first and foremost. My daughter is almost 13 months old, and she keeps me very busy! In my free time I enjoy DIY projects, including crafts, upcycling items, and much more. I also love coming up with creative, easy, and, most of all, delicious ways to feed my family. I will also be blogging about us, as Ben works his way through law school, Izzy grows and develops, and I try to keep up with it all! I hope you enjoy our exploits as much as we do! Thanks so much for stopping by!